
티스토리 뷰
Hyperledger Fabric v2.x + node.js sdk로 간단한 페이지 구성
4567은 소수 2022. 5. 8. 00:07참고 : https://hyperledger.github.io/fabric-sdk-node/release-2.2/module-fabric-network.html
https://github.com/hyperledger/fabric-samples
하이퍼레저 패브릭 실전 프로젝트 - 조문옥 , 이진수 , 조성완 , 반장현 지음
http://www.kyobobook.co.kr/product/detailViewKor.laf?mallGb=KOR&ejkGb=KOR&barcode=9791161753942
기본 패브릭 네트워크 구성은 지난 번에 포스팅한 멀티 호스트 환경을 이용하였습니다.
https://ghqls0210.tistory.com/254?category=930251
Hyperledger Fabric v2.2 Multi Host 테스트
하이퍼레저 패브릭 2.2 버전으로 멀티 호스트 (2 Host) 구축을 실습해봤습니다. 환경 : Ubuntu 20.04 VM - Host1, Host2 docker 20.10.13 go 1.17.8 Hyperledger Fabric v2.2 과정은 다음과 같습니다. 1. Host1 :..
ghqls0210.tistory.com
네트워크 구성보다는 node.js sdk를 이용해 패브릭 네트워크와 클라이언트를 연결하는 과정이므로 네트워크는 기본 네트워크 등 여러 네트워크를 이용하면 됩니다.
1. 패브릭 네트워크 구동
미리 구성해놓은 fabric network를 올립니다.

2. CA 구성
sdk와 연결될 CA를 구성합니다. 각 네트워크 환경에 맞게 다음과 같이 구성하면 됩니다.
저는 네트워크 환경 구성을
network 이름 : byfn => 현재 구동 중인 fabric network = testnet
으로 초기에 설정하였었고,
ca.org1.example.com, ca.org2.example.com 컨테이너를 이용해 sdk와 연결시킬 예정입니다. 해당 컨테이너의 속성은 위 양식에 맞게 수정하면 됩니다.
(volume 시킬 경로와 port 번호 안 겹치게 주의!)
그리고 해당 ca 컨테이너를 올립니다.
docker-compose -f docker-compose-ca.yaml up -d3. 체인코드 설치
sdk와 연결시켜서 사용할 체인코드를 미리 설치합니다.
체인코드 설치도 기존과 동일하게 진행하면 됩니다.
저는 기본으로 주어진 asset-transfer-basic 코드를 이용했습니다.
4. package.json 작성
package.json 작성에 앞서 application 디렉토리 구성은 다음과 같습니다.
nodejs sdk에서 사용할 패키지들을 정리한 것입니다.
저는 다음과 같이 지정하였습니다.
fabric v2를 사용했기 때문에 dependency에도 이에 맞는 버전을 지정하였습니다.
이후 npm install --save를 통해 node_modules를 만듭니다.
5. connection.json 작성
nodejs sdk와 fabric 네트워크를 연결시킬 사항들을 정리한 것입니다. 해당 json 파일에 적힌 속성을 이용해 fabric 네트워크에 트랜잭션을 발생시킵니다.
저는 ca.org1.example.com 컨테이너의 속성을 이용해 fabric 네트워크와 연결짓도록 하였습니다.
형식에 맞게 올바른 이름과 path, port 설정 등을 하면 됩니다.
6. admin, user 등록
해당 네트워크에 접속할 admin과 user를 등록합니다.
앞으로 application을 통해 fabric 네트워크에 접속할 admin과 user를 등록하기에 앞서 앞으로 application 개발에 필요한 기본 utility를 fabric-samples에서 가져왔습니다.
util/caUtil.js
/*
 * Copyright IBM Corp. All Rights Reserved.
 *
 * SPDX-License-Identifier: Apache-2.0
 */

'use strict';

const adminUserId = 'admin';
const adminUserPasswd = 'adminpw';

/**
 *
 * @param {*} FabricCAServices
 * @param {*} ccp
 */
exports.buildCAClient = (FabricCAServices, ccp, caHostName) => {
	// Create a new CA client for interacting with the CA.
	const caInfo = ccp.certificateAuthorities[caHostName]; //lookup CA details from config
	const caTLSCACerts = caInfo.tlsCACerts.pem;
	const caClient = new FabricCAServices(caInfo.url, { trustedRoots: caTLSCACerts, verify: false }, caInfo.caName);

	console.log(`Built a CA Client named ${caInfo.caName}`);
	return caClient;
};

exports.enrollAdmin = async (caClient, wallet, orgMspId) => {
	try {
		// Check to see if we've already enrolled the admin user.
		const identity = await wallet.get(adminUserId);
		if (identity) {
			console.log('An identity for the admin user already exists in the wallet');
			return;
		}

		// Enroll the admin user, and import the new identity into the wallet.
		const enrollment = await caClient.enroll({ enrollmentID: adminUserId, enrollmentSecret: adminUserPasswd });
		const x509Identity = {
			credentials: {
				certificate: enrollment.certificate,
				privateKey: enrollment.key.toBytes(),
			},
			mspId: orgMspId,
			type: 'X.509',
		};
		await wallet.put(adminUserId, x509Identity);
		console.log('Successfully enrolled admin user and imported it into the wallet');
	} catch (error) {
		console.error(`Failed to enroll admin user : ${error}`);
	}
};

exports.registerAndEnrollUser = async (caClient, wallet, orgMspId, userId, affiliation) => {
	try {
		// Check to see if we've already enrolled the user
		const userIdentity = await wallet.get(userId);
		if (userIdentity) {
			console.log(`An identity for the user ${userId} already exists in the wallet`);
			return;
		}

		// Must use an admin to register a new user
		const adminIdentity = await wallet.get(adminUserId);
		if (!adminIdentity) {
			console.log('An identity for the admin user does not exist in the wallet');
			console.log('Enroll the admin user before retrying');
			return;
		}

		// build a user object for authenticating with the CA
		const provider = wallet.getProviderRegistry().getProvider(adminIdentity.type);
		const adminUser = await provider.getUserContext(adminIdentity, adminUserId);

		// Register the user, enroll the user, and import the new identity into the wallet.
		// if affiliation is specified by client, the affiliation value must be configured in CA
		const secret = await caClient.register({
			affiliation: affiliation,
			enrollmentID: userId,
			role: 'client'
		}, adminUser);
		const enrollment = await caClient.enroll({
			enrollmentID: userId,
			enrollmentSecret: secret
		});
		const x509Identity = {
			credentials: {
				certificate: enrollment.certificate,
				privateKey: enrollment.key.toBytes(),
			},
			mspId: orgMspId,
			type: 'X.509',
		};
		await wallet.put(userId, x509Identity);
		console.log(`Successfully registered and enrolled user ${userId} and imported it into the wallet`);
	} catch (error) {
		console.error(`Failed to register user : ${error}`);
	}
};
util/appUtil.js
/*
 * Copyright IBM Corp. All Rights Reserved.
 *
 * SPDX-License-Identifier: Apache-2.0
 */

'use strict';

const fs = require('fs');
const path = require('path');

exports.buildCCPOrg1 = () => {
	// load the common connection configuration file
	const ccpPath = path.resolve(__dirname, '..', 'connection.json');
	const fileExists = fs.existsSync(ccpPath);
	if (!fileExists) {
		throw new Error(`no such file or directory: ${ccpPath}`);
	}
	const contents = fs.readFileSync(ccpPath, 'utf8');

	// build a JSON object from the file contents
	const ccp = JSON.parse(contents);

	console.log(`Loaded the network configuration located at ${ccpPath}`);
	return ccp;
};

exports.buildWallet = async (Wallets, walletPath) => {
	// Create a new  wallet : Note that wallet is for managing identities.
	let wallet;
	if (walletPath) {
		wallet = await Wallets.newFileSystemWallet(walletPath);
		console.log(`Built a file system wallet at ${walletPath}`);
	} else {
		wallet = await Wallets.newInMemoryWallet();
		console.log('Built an in memory wallet');
	}

	return wallet;
};

exports.prettyJSONString = (inputString) => {
	if (inputString) {
		 return JSON.stringify(JSON.parse(inputString), null, 2);
	}
	else {
		 return inputString;
	}
}
또한 공통으로 사용할 전역 변수들을 sdk/common.js에 넣었습니다.
sdk/common.js
exports.channelName = 'channel1';
exports.chaincodeName = 'basic';
exports.mspOrg1 = 'Org1MSP';
exports.org1UserId = 'appUser';
이를 이용해 admin, user 등록을 진행하겠습니다.
sdk/enrollAdmin.js
/*
 * Copyright IBM Corp. All Rights Reserved.
 *
 * SPDX-License-Identifier: Apache-2.0
 */

'use strict';

const { Gateway, Wallets } = require('fabric-network');
const FabricCAServices = require('fabric-ca-client');
const path = require('path');
const { buildCAClient, registerAndEnrollUser, enrollAdmin } = require('../util/caUtil.js');
const { buildCCPOrg1, buildWallet, prettyJSONString } = require('../util/appUtil.js');
const walletPath = path.join(__dirname, '../wallet');
const { channelName, chaincodeName, mspOrg1, org1UserId } = require('./common.js');

async function main() {
    try {
        const ccp = buildCCPOrg1(); // ccp : common connection configuration file path

        const caClient = buildCAClient(FabricCAServices, ccp, 'ca.org1.example.com'); // instance of the fabric ca service client

        const wallet = await buildWallet(Wallets, walletPath); // setup wallet

        await enrollAdmin(caClient, wallet, mspOrg1); // administrative flow in real application

        console.log("Success for enrolling admin!!!");
    }
    catch(error) {
        console.log("Faile to enrolling admin!!!");
        console.log(error)
    }
}

main();
각 모듈로부터 필요한 정보들을 require로 받아 오고, fabric network에 연결할 client (caClient) 정보와 wallet 을 생성하여 admin 등록을 진행합니다.
sdk/registerUser.js
/*
 * Copyright IBM Corp. All Rights Reserved.
 *
 * SPDX-License-Identifier: Apache-2.0
 */

'use strict';

const { Gateway, Wallets } = require('fabric-network');
const FabricCAServices = require('fabric-ca-client');
const path = require('path');
const { buildCAClient, registerAndEnrollUser, enrollAdmin } = require('../util/caUtil.js');
const { buildCCPOrg1, buildWallet, prettyJSONString } = require('../util/appUtil.js');
const walletPath = path.join(__dirname, '../wallet');
const { channelName, chaincodeName, mspOrg1, org1UserId } = require('./common.js');

async function main() {
    try {
        const ccp = buildCCPOrg1(); // ccp : common connection configuration file path

        const caClient = buildCAClient(FabricCAServices, ccp, 'ca.org1.example.com'); // instance of the fabric ca service client

        const wallet = await buildWallet(Wallets, walletPath); // setup wallet

        await registerAndEnrollUser(caClient, wallet, mspOrg1, org1UserId, 'org1.department1'); // add new user

        console.log("Success for registering user!!!");
    }
    catch(error) {
        console.log("Faile to registering user!!!");
        console.log(error)
    }
}

main();
작성 후 node enrollAdmin.js, node registerUser.js 를 진행합니다. 진행 후 wallet/admin.id와 wallet/appUser.id 가 생성됩니다.

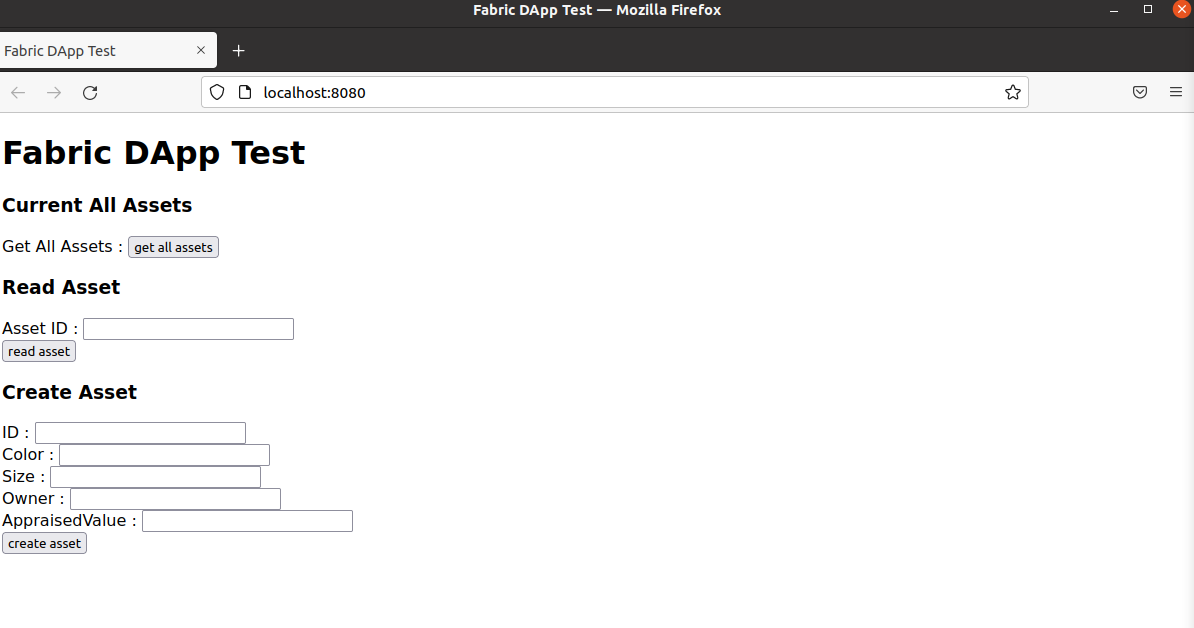
7. 기본 템플릿 구성
간단하게 테스트한거라 템플릿은 html 만을 이용했습니다.
그리고 GetAllAssets, ReadAsset, CreateAsset 3가지 기능만을 페이지에 추가하였지만, 나머지 기능들도 get 메서드를 url으로 날리면 체인코드가 동작하도록 server를 구성하였습니다. (server는 뒤에)
메인페이지 : app/main.html
<!DOCTYPE html>
<html>
    <head>
        <meta charset="UTF-8">
        <title>Fabric DApp Test</title>
    </head>
    <body>
        <h1>Fabric DApp Test</h1>
        <div id="allAssets">
            <h3>Current All Assets</h3>
            <form action="/GetAllAssets" method="get">
                Get All Assets : <input type="submit" value="get all assets">
                <!-- <button type="button" onclick="location.href='getAllAssets.html'">get all asset</button> -->
            </form>
        </div>

        <div id="readAsset">
            <h3>Read Asset</h3>
            <form action="/ReadAsset" method="get">
                Asset ID : <input name="id" type="text" size="20"><br>
                <input type="submit" value="read asset">
            </form>
        </div>

        <div id="CreateAsset">
            <h3>Create Asset</h3>
            <form action="/CreateAsset" method="get">
                ID : <input name="id" type="text" size="20"><br>
                Color : <input name="color" type="text" size="20"><br>
                Size : <input name="size" type="text" size="20"><br>
                Owner : <input name="owner" type="text" size="20"><br>
                AppraisedValue : <input name="appraisedValue" type="text" size="20"><br>
                <input type="submit" value="create asset">
            </form>
        </div>
    </body>
</html>
클라이언트가 get으로 받을 페이지 기본 구성 : app/template.js
module.exports = {
    HTML:function(func, type, data) {
        // func : chaincode name
        // type : true : submit tx, false : evaluate tx
        // data : data from get/post
        return `
        <!DOCTYPE html>
        <html>
            <head>
                <meta charset="UTF-8">
                <title>Fabric DApp Test</title>
            </head>
            <body>
                <h1>${func}</h1>
                <div id=${func}>
                    ${data}
                </div>
            </body>
        </html>
        `;
    }
}
8. server 구성
server는 sdk를 이용해 fabric 네트워크에 트랜잭션이나 쿼리를 날릴 sdk.js, sdk에 정보를 넘겨줄 controller.js, express 서버를 올릴 server.js 로 구성됩니다.
해당 구성이 가장 중요한 부분이므로 살펴보겠습니다.
server/sdk.js
/*
 * Copyright IBM Corp. All Rights Reserved.
 *
 * SPDX-License-Identifier: Apache-2.0
 */

'use strict';

const { Gateway, Wallets } = require('fabric-network');
const FabricCAServices = require('fabric-ca-client');
const path = require('path');
const { buildCAClient, registerAndEnrollUser, enrollAdmin } = require('../util/caUtil.js');
const { buildCCPOrg1, buildWallet, prettyJSONString } = require('../util/appUtil.js');
const walletPath = path.join(__dirname, '../wallet');
const { channelName, chaincodeName, mspOrg1, org1UserId } = require('../sdk/common.js');

const template = require('../app/template.js');

async function send(type, func, args, res) {
    try {
        const ccp = buildCCPOrg1();

        const wallet = await Wallets.newFileSystemWallet(walletPath);

        const gateway = new Gateway(); // new gateway instance for interacting with fabric network

        // connect to gateway with connecting profile
        await gateway.connect(ccp, {
            wallet: wallet,
            identity: org1UserId,
            discovery: { enabled: true, asLocalhost: true }
        });

        const network = await gateway.getNetwork(channelName); // get network with channel name

        const contract = network.getContract(chaincodeName); // get contract with chaincode name

        console.log('>>>> Transaction <<<<');

        if(type == true) { // type true : submit transaction, not only query
            await contract.submitTransaction(func, ...args);
            console.log('Submit transaction success');

            const resultString = 'Submit Transcation success!!!';
            const html = template.HTML(func, type, resultString);
            res.send(html);
        } else {
            const result = await contract.evaluateTransaction(func, ...args);
            console.log('Evaluate transaction success');
            //const resultJSONString = prettyJSONString(result.toString());
            //console.log(`*** Result: ${resultJSONString}`);
            const resultString = result.toString();
            console.log(`*** Result: ${resultString}`);
            //res.send(resultJSONString);
            //res.send(resultString);

            const html = template.HTML(func, type, resultString);
            res.send(html);
        }

        await gateway.disconnect();
    }
    catch(error) {
        console.log('Fail transaction');
        console.log(error);
        res.send(error);
    }
}

module.exports = {
    send:send
}
fabric 네트워크에 접속할 id 가 담긴 wallet을 가져온 뒤 gateway와 연결합니다.
const ccp = buildCCPOrg1();

const wallet = await Wallets.newFileSystemWallet(walletPath);

const gateway = new Gateway(); // new gateway instance for interacting with fabric network

// connect to gateway with connecting profile
await gateway.connect(ccp, {
      wallet: wallet,
      identity: org1UserId,
      discovery: { enabled: true, asLocalhost: true }
});
그리고 해당 gateway를 이용해 fabric 네트워크의 채널과 연결하고 트랜잭션을 날릴 체인코드와 연결합니다.
const network = await gateway.getNetwork(channelName); // get network with channel name

const contract = network.getContract(chaincodeName); // get contract with chaincode name
이후 type이 true 일 때는 실제 트랜잭션을 발생시켜 블록에 해당 정보가 들어가는 경우, false인 경우는 쿼리만 날려 정보를 얻어오는 경우입니다. (트랜잭션 X)
true인 경우 asset-transfer-basic의 체인코드 리턴값이 nil 또는 error 등으로 지정되어 있어, 이를 건드리지 않았기 때문에 success 했다는 string만 get으로 받아오게 되며, false인 경우 체인코드 리턴값이 쿼리 결과이기 때문에 해당 쿼리 결과를 보여줍니다. (간단하게 짠 거라 따로 예쁘게 보여주지는 않고 그냥 string으로 보여주도록 하였습니다.)
        if(type == true) { // type true : submit transaction, not only query
            await contract.submitTransaction(func, ...args);
            console.log('Submit transaction success');

            const resultString = 'Submit Transcation success!!!';
            const html = template.HTML(func, type, resultString);
            res.send(html);
        } else {
            const result = await contract.evaluateTransaction(func, ...args);
            console.log('Evaluate transaction success');
            //const resultJSONString = prettyJSONString(result.toString());
            //console.log(`*** Result: ${resultJSONString}`);
            const resultString = result.toString();
            console.log(`*** Result: ${resultString}`);
            //res.send(resultJSONString);
            //res.send(resultString);

            const html = template.HTML(func, type, resultString);
            res.send(html);
        }

        await gateway.disconnect();
그리고 해당 get으로 받아올 정보를 html로 보여주고 gateway를 종료합니다.
server/controller.js
var sdk = require('./sdk.js');

module.exports = function(app) {

    app.get('/GetAllAssets', function (req, res) {
        let args = [];
        sdk.send(false, 'GetAllAssets', args, res);
    });

    app.get('/AssetExists', function (req, res) {
        var id = req.query.id;
        let args = [id];
        sdk.send(false, 'AssetExists', args, res);
    });

    app.get('/DeleteAsset', function (req, res) {
        var id = req.query.id;
        let args = [id];
        sdk.send(true, 'DeleteAsset', args, res);
    });

    app.get('/InitLedger', function (req, res) {
        let args = [];
        sdk.send(true, 'InitLedger', args, res);
    });

    app.get('/ReadAsset', function (req, res) {
        var id = req.query.id;
        let args = [id];
        sdk.send(false, 'ReadAsset', args, res);
    });

    app.get('/TransferAsset', function (req, res) {
        var id = req.query.id;
        var newOwner = req.query.newOwner;
        let args = [id, newOwner];
        sdk.send(true, 'TransferAsset', args, res);
    });

    app.get('/CreateAsset', function (req, res) {
        var id = req.query.id;
        var color = req.query.color;
        var size = req.query.size;
        var owner = req.query.owner;
        var appraisedValue = req.query.appraisedValue;
        let args = [id, color, size, owner, appraisedValue];
        sdk.send(true, 'CreateAsset', args, res);
    });

    app.get('/UpdateAsset', function (req, res) {
        var id = req.query.id;
        var color = req.query.color;
        var size = req.query.size;
        var owner = req.query.owner;
        var appraisedValue = req.query.appraisedValue;
        let args = [id, color, size, owner, appraisedValue];
        sdk.send(true, 'UpdateAsset', args, res);
    });
}
sdk에 넘겨줄 정보를 처리하는 과정입니다. 테스트를 위해 클라이언트에서 전부 get으로 쿼리를 날려 받아오도록 하였고, 체인코드 종류에 따라 필요한 파라미터만 잘 조절하면 됩니다.
server/server.js
const express = require('express');
const app = express();

var path = require('path');
var sdk = require('./sdk.js');

var http = require('http');
var bodyParser = require('body-parser');
var fs = require('fs');
var util = require('util');
var os = require('os');

app.use(bodyParser.urlencoded({extended: true}));
app.use(bodyParser.json());

require('./controller.js')(app);
app.use(express.static(path.join(__dirname, '../app')));

var port = process.env.PORT || 8080;
var HOST = 'localhost';

app.listen(port,function(){
  console.log(`Live on port: http://${HOST}:${port}`);
});

app.get('/', function (req, res) {
    res.sendFile(path.join(__dirname, '../app/main.html'));
});
express를 이용해 구동하였고, controller.js를 통해 클라이언트가 쿼리를 날리면 controller.js -> sdk.js 로 연결된 트랜잭션 발생 뒤, 클라이언트에게 보여줄 페이지를 넘겨줍니다.
9. 결과
node server.js 를 이용해 http://localhost:8080 를 확인합니다.
최종 결과는 다음과 같습니다.
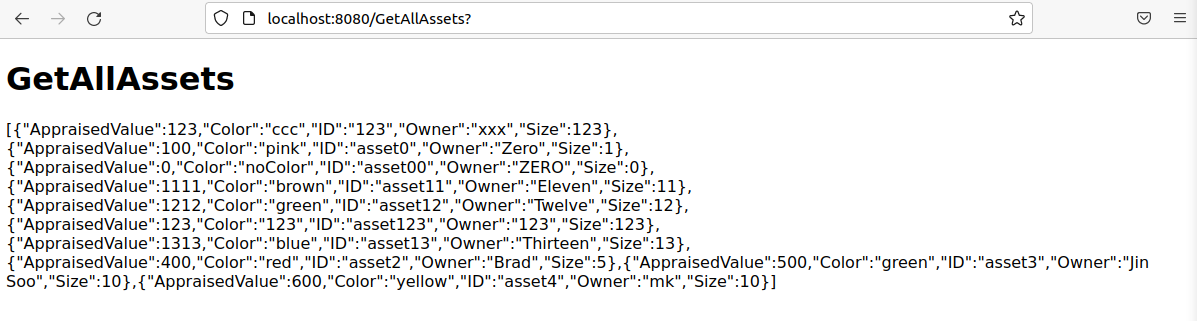
get all assets 버튼을 누르면 다음과 같이 잘 받아옵니다. (테스트 몇 번 하느라 초기값과 결과는 다릅니다.)
main.html에는 없는 DeleteAsset을 get으로 보내도 잘 동작합니다. (controller.js에는 있기 때문)

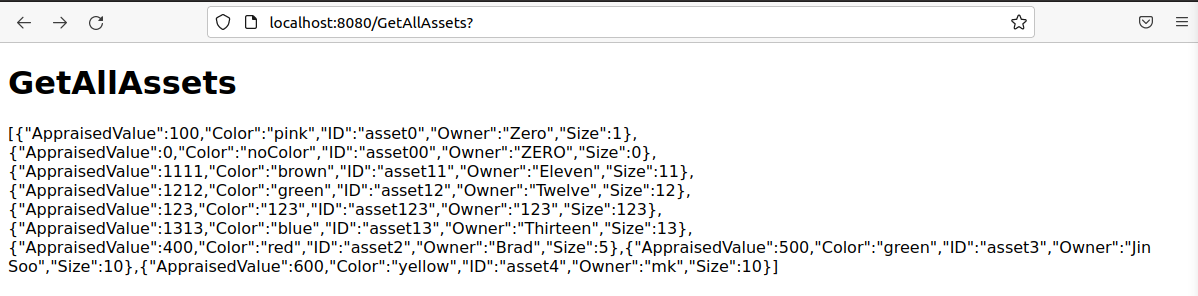
첫 줄에 있던 id=123 의 값이 없어짐을 알 수 있습니다.
'블록체인 > Hyperledger Fabric v2.2' 카테고리의 다른 글
| Hyperledger Fabric v2.2 Multi Host 테스트 (1) | 2022.03.27 |
|---|